Friday, July 15, 2011

COMMON MISTAKES DONE IN PHOTOGRAPHY

Whether you're a professional or an amateur, there are several photography mistakes that are surprisingly common. We'll explain why these mistakes occur, give you tips to prevent them, and then show you how to fix the flaws using in-printer editing tools featured on HP Photosmart All-in-Ones.

Mistake #1: Red-eye


Before and After shots of red-eye.
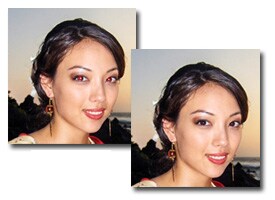
Although it only affects a small area, red-eye can have a big impact on the quality of your photo.


HP Photosmart Premium e-All-in-One
Take advantage of the instant Photo Fix feature on the HP Photosmart Premium e-All-in-One for red-eye removal without using a PC or editing software.
Red-eye may be a small flaw, but it can still make the difference between a frame-worthy photo and one you dismiss to a dusty shoebox in the back of the closet.


What causes it

When you take photos in a dim or dark setting, the light from your camera’s flash reflects off the subject's eyes. The resulting red glow (red-eye) is the blood vessels illuminated within the subject's retinas.

How to prevent it

  • Avoid using your flash whenever possible. (If you're not sure, take a few test shots with flash and without to see whether you absolutely need it.)
  • If you have to use your flash, ask your subject not to look directly into the camera lens.
  • Look for the Red-eye reduction feature offered on many digital cameras.

How to fix it


Mistake #2: Lack of a focal point


Family building a snowman.
Although this photo presents a stunning winter landscape, the family becomes lost amidst the competing scenery.


A cropped photo of the family building a snowman
By cropping, the family reclaims the spotlight and the photo still captures some of the picturesque surroundings.

Even an image that possesses many qualities of a great photo (sharp focus, accurate colors, correct lighting) can be compromised by lacking an obvious focal point or main subject.


What causes it

  • Shooting your subject against a busy or competing background or foreground.
  • Trying to fit too much into one picture. (The entire family, the scenery, and a famous landmark are too much for a single vacation photo.)
  • Taking a photo from far away, making your subject too small to be an obvious focal point.


How to prevent it

  • Physically move closer to your subject.
  • Use your camera's zoom feature.
  • Before you snap your shot, ask yourself: "What is the main subject of this photo?" and "Does my subject fill the frame?"

How to fix it

  • Cropping allows you to eliminate unnecessary or unwanted elements from your photo, bringing the focus back to the main subject. Use cropping to "zoom" in on your photo after you've taken it.
  • Several HP printers, such as the HP Photosmart Plus e-All-in-One, let you crop photos directly from the printer's TouchSmart screen—no PC required.

  • Learn more about improving photos with cropping.


Mistake #3: Blur


Blurry photo of family on roller coaster
Action shots are engaging, but can be difficult to take without blur.


Sharpened photo of family on roller coaster.
If available, use your camera's Action mode to help avoid blur when your main subjects are in motion.


In-printer editing menu.
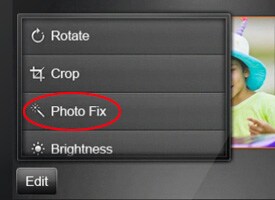
Choose the Photo Fix option from your printer's editing menu to automatically sharpen your photos.
Whether it's low lighting, a shaky hand holding the camera, or a subject on the move, blur can ruin an otherwise great picture.


What causes it

  • A camera moving or shaking—even the slightest amount.
  • Shutter lag (the pause after you trigger the shutter before a camera takes a photo) while your subject is in motion.
  • Insufficient lighting.


How to prevent it

  • Use a tripod or brace yourself against a stationary object so it's easier to hold the camera still.
  • Avoid shutter lag by holding the shutter button on your camera halfway down, waiting for your subject to make their move, and then pressing the button down the rest of the way.
  • See if your camera offers an Action mode for automatic shutter speed adjustment, or a Nightor Night Portrait mode to help with low lighting. (A tripod is usually necessary for these modes due to the extended exposure times.)

How to fix it


»Back to top

Mistake #4: Underexposed photos


Before and after shot of an underexposed photo.
An underexposed photo can leave your subjects in the dark.


Brightness editing option circled in red.
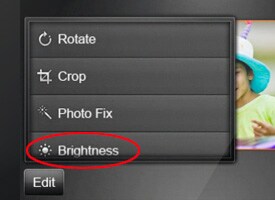
Manually adjust the brightness of your photos using in-printer editing tools offered on many HP Photosmart All-in-Ones.

Exposure is the amount of light that passes through your camera lens. When a photo is underexposed, it appears too dark, making if difficult to see the subject clearly or to distinguish details.


What causes it

  • Shooting in a dimly lit space.
  • Standing too far away from your subject.
  • Setting your camera's shutter speed (the length of time the shutter stays open) too fast.


How to prevent it

  • If you're shooting indoors, move near a window or lamp to add extra light.
  • Move closer to your subject.
  • Manually adjust the shutter speed on your camera so that it's slower.

How to fix it


Mistake #5: Overexposed photos


Overexposed photo of mother and daughter.
A photo taken in direct sunlight on a bright day can cause your subjects to look washed-out.


Photo with correct exposure.
Find a source of shade to provide even lighting for your subject.

When an excess of light passes through a camera lens, the resulting photo can be too bright, washing-out the subject, obscuring details, and creating harsh shadows.


What causes it

The main cause of overexposed photos is bright light, whether it’s indoor lighting or natural sunlight.

How to prevent it

  • If you're shooting on a sunny day, look for a shady spot for your subject.
  • Use a flash to help even out the lighting and avoid severe shadows.
  • If possible, take advantage of overcast days—they’re ideal for outdoor photography.

How to fix it

  • Correct overexposure by manually adjusting the brightness of your photo in-printer on select HP Photosmart All-in-Ones, including the HP Photosmart Premium e-All-in-One.
  • You could also use the Instant Photo Fixfeature, available on select HP printers, which will automatically reduce brightness and contrast for a softer, more balanced photo print. Find out more about automatically improving photos before printing.
  • Explore these five easy editing fixes to get additional tips for adjusting your photo's lighting using editing software.


»